Homework 3: A Tour of Apache Spark
Gain a hands-on understanding of Google Cloud Dataproc, Apache Spark, Spark SQL, and Spark Streaming over HDFS.
Released: March 26, 2026
Due: April 14, 2026
Overview
First introduced in 2010, Apache Spark is one of the most popular modern cluster computing frameworks.
By leveraging its innovative distributed memory abstraction – Resilient Distributed Datasets (RDDs) – Apache Spark provides an effective solution to the I/O inefficiency of MapReduce, while retaining its scalability and fault tolerance.
In this assignment, you will deploy Spark and HDFS, write a Spark program generating a web graph from the entire Wikipedia, and write a PageRank program to analyze the web graph.
You will run those applications using Spark over HDFS in Google Cloud Dataproc.
As a well-maintained open-source framework, Apache Spark has well-written official documentation; you will find a lot of useful information by simply reading the official tutorials and documents.
When you encounter an issue regarding cluster deployment or writing Spark programs, you are encouraged to utilize online resources before posting questions on Ed.
Learning Outcomes
After completing this programming assignment, you should be able to:
- Deploy and configure Apache Spark, HDFS in Google Cloud Dataproc.
- Write Spark applications using Python with Jupyter Notebook and launch them in the cluster.
- Describe how Apache Spark, Spark SQL, Spark Streaming, and HDFS work and interact with each other.
Step-by-Step Environment Setup
Step 1: Redeem Your GCP Credits
Make sure you have followed the instructions provided by CRF to redeem your credits in Google Cloud.
Step 2: Set Up Your GCP Project
- Go to the Google Cloud Console.
- Create a new project or use the existing course project
csee4121-s26. - Make sure billing is enabled on the project.
Step 3: Enable the Dataproc API
- Go to the Dataproc console.
- Click on Enable API to enable Google Cloud Dataproc.
- Note: you can pin Dataproc on your navigation menu for quick access.
Step 4: Create a Cloud Storage Bucket
You need a GCS bucket to store your notebook backups and Spark output files. This protects your work in case your cluster goes down.
- Go to Cloud Storage in the GCP Console.
- Click Create Bucket.
- Choose a globally unique name — we recommend using your project ID as a prefix, e.g.,
csee4121-s26-<your-uni>-hw2. - Choose the same region you plan to use for your cluster (e.g.,
us-east1). - Leave all other settings as defaults and click Create.
Important: GCS bucket names must be globally unique across all of Google Cloud. If a name is already taken by anyone, you will get a
409 Conflicterror. Always prefix with your project ID or UNI to avoid this.
Note: You can verify your bucket is accessible at any time by running this command (in a terminal or notebook cell):
gsutil ls gs://<your-bucket-name>/If you see
AccessDeniedException: 403, the bucket does not exist in your project or the name is wrong.
Step 5: Create Your Dataproc Cluster
Click on Create cluster in the Dataproc console and select Create cluster on Compute Engine. We will start with a Single Node cluster for debugging.
| Setting | Recommended Value |
|---|---|
| Cluster name | hw2-spark-cluster (or any name) |
| Region | us-east1 (must match your bucket’s region) |
| Cluster mode | Single Node (for debugging; switch to Standard with 2 workers for Questions 3-8) |
| Machine type | n4-standard-4 (4 vCPUs, 16 GB RAM) |
| Image version | 2.1-debian11 (Spark 3.3.x) |
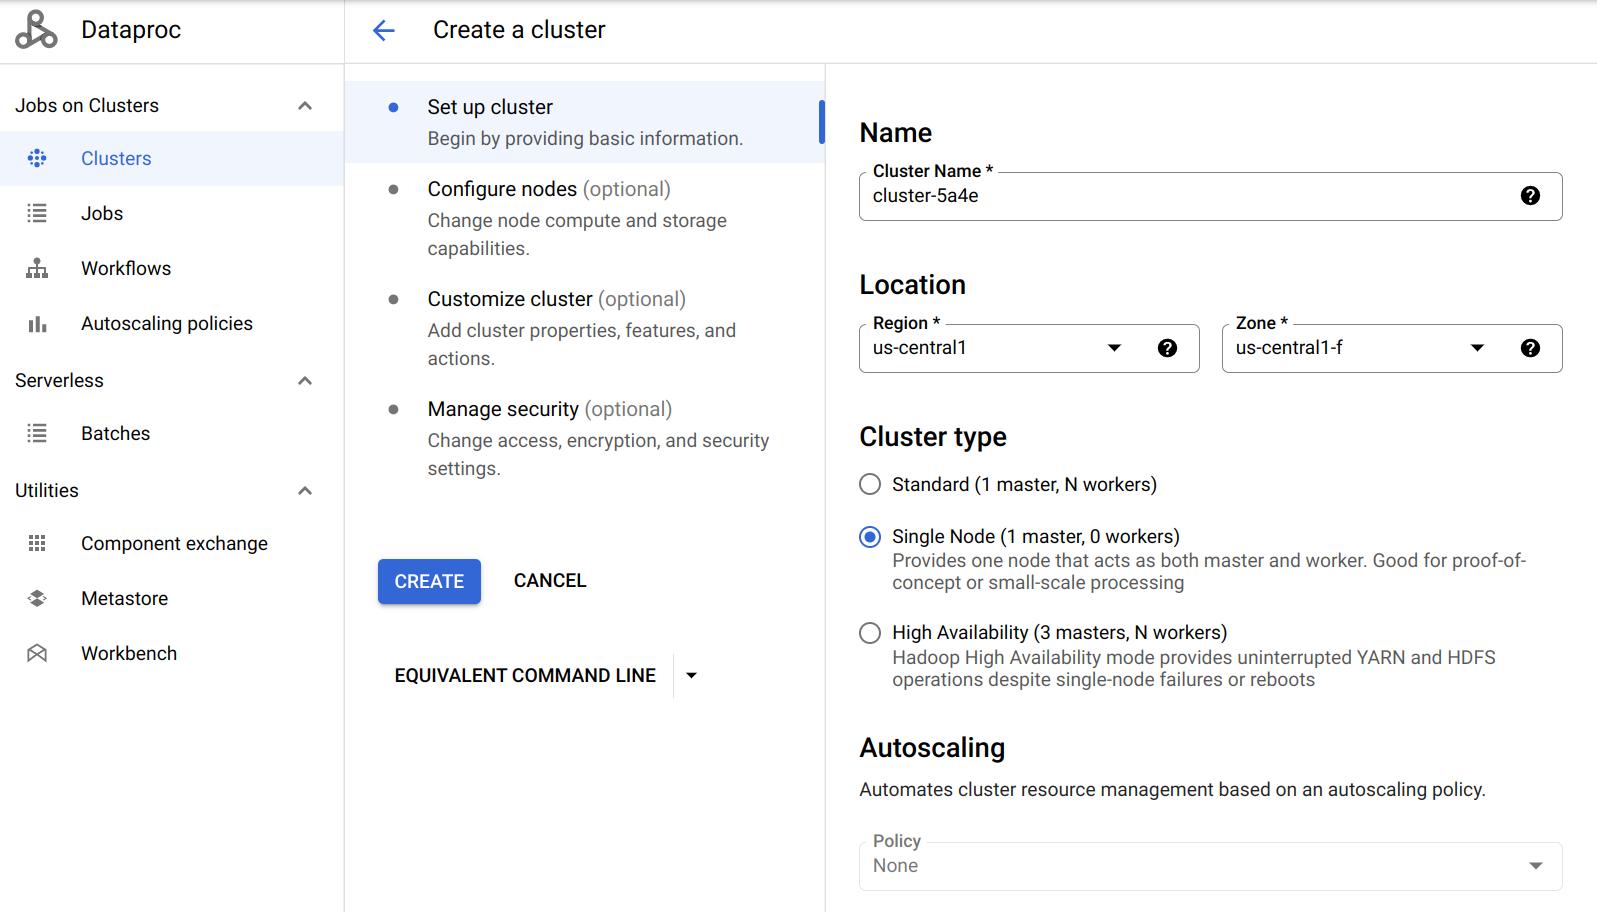
Enable Jupyter Notebook
- Scroll down to Component gateway and select Enable access to the web interfaces of default and selected optional components on the cluster.
- Click on Advanced options.
- Under Optional components, click Select component.
- Choose Jupyter Notebook (Anaconda is pre-installed with miniconda in image 2.1; see this for details).
- Click Select to save.

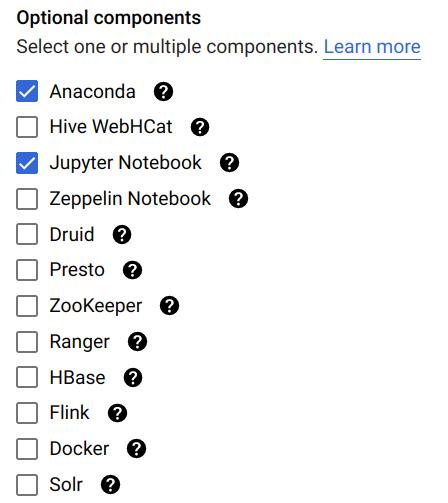
Refer to this doc for more details.
Attach Your Cloud Storage Staging Bucket
- In the Advanced options section, go to Cloud Storage staging bucket.
- Click Browse and select the bucket you created in Step 4.

Note: This step is technically optional but highly recommended. Dataproc will automatically save your notebooks to the linked bucket, protecting your work from cluster failures.
Cluster Properties
Components like Spark and Hadoop have many configurations that users can tune. You can change the default values when creating the cluster under Cluster properties in the Advanced Options section. You will need to edit cluster properties for some questions, but you can leave it alone to get started.
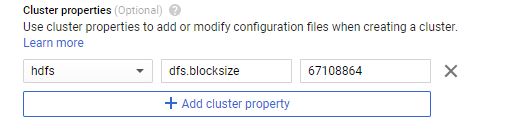
Refer to this doc for more details.
Step 6: Copy Data to HDFS
Once the cluster is created, go to Cluster details → VM Instances tab → click SSH on your master node.
Run the following commands to copy files into HDFS:
hdfs dfs -cp gs://csee4121-s26-data/wiki-small.xml /
hdfs dfs -cp gs://csee4121-s26-data/wiki-test.xml /
hdfs dfs -cp gs://csee4121-s26-data/wiki-whole.xml /
Note: The files might take a while to transfer. In the meantime, here is a tutorial for HDFS commands.
Verify the files are in HDFS:
hdfs dfs -ls /
Step 7: Install the spark-xml JAR
You need the spark-xml library to parse XML files. Run this command on your VM (run on all VMs if you have multiple nodes):
sudo hdfs dfs -get gs://csee4121-s26-data/spark-xml_2.12-0.16.0.jar /usr/lib/spark/jars/
Step 8: Open Jupyter Notebook
- Go to Cluster details → Web Interfaces tab.
- Click the Jupyter link to open the Jupyter Notebook interface.
- If the link doesn’t work, try changing
httpstohttpin the URL. - Important: In the Jupyter file browser, double-click the
GCSfolder. You cannot create files in the root directory because it is read-only. - Create a new PySpark notebook inside the
GCSfolder, or uploadprog_hw2_starter.ipynbfrom the repository.
Important: The notebook kernel should be PySpark, not Python 3. This ensures Spark is available in your session.
Data Setup
Before starting the tasks, you must copy the Wikipedia datasets from the shared class bucket to your cluster’s internal storage (HDFS).
Open a terminal on your Dataproc master node (or use the SSH button in the Google Cloud Console) and run the following commands:
# Copy the small debugging file
hdfs dfs -cp gs://csee4121-s26-data/wiki-small.xml /

# Copy the medium test file (for Questions 2-4)
hdfs dfs -cp gs://csee4121-s26-data/wiki-test.xml /

# Copy the large dataset (for Questions 5-8)
hdfs dfs -cp gs://csee4121-s26-data/wiki-whole.xml /
You can verify the files are successfully copied by running:
hdfs dfs -ls /
Task 1: Getting Started (6 Points)
In this task, we provide you a big Wikipedia database in XML format. It can be found at /wiki-whole.xml in your HDFS.
This input file is very big (~1 GB) and you have to use a distributed file system like HDFS to handle it. We have also provided a smaller file /wiki-small.xml for debugging purposes.
The XML files are structured as follows:
<mediawiki>
    <siteinfo>
        ...
    </siteinfo>
    <page>
        <title>Title A</title>
        <revision>
            <text>Some text</text>
        </revision>
    </page>
    <page>
        ...
    </page>
    ...
</mediawiki>
To get a sense of how a Wiki page transfers to an XML file, take a look at the following examples:
Task 1 Code
In your Jupyter notebook (PySpark kernel), create and run the following cells:
Cell 1 — Initialize Spark:
from pyspark.sql import SparkSession
spark = SparkSession.builder.getOrCreate()
Cell 2 — Read the XML file:
df = spark.read.format('xml').options(rowTag='page').load('hdfs:/wiki-small.xml')
Cell 3 — Print the schema:
df.printSchema()
If you are having trouble debugging your code, try adding the following at the top of your notebook:
import os
os.environ['PYSPARK_SUBMIT_ARGS'] = '--packages com.databricks:spark-xml_2.12:0.14.0 pyspark-shell'
Question 1. (4 points) What is the default block size on HDFS? What is the default replication factor of HDFS on Dataproc?
Task 1 Output
Copy the outputted schema to a separate txt file named schema.txt. (6 points)
Submitting a Job
Once you are done debugging in Jupyter Notebook, you can download it as a Python (.py) file and submit it as a job to run on the cluster:
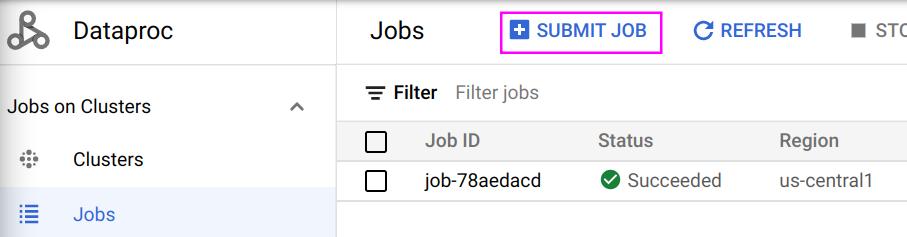
The following is an example job:
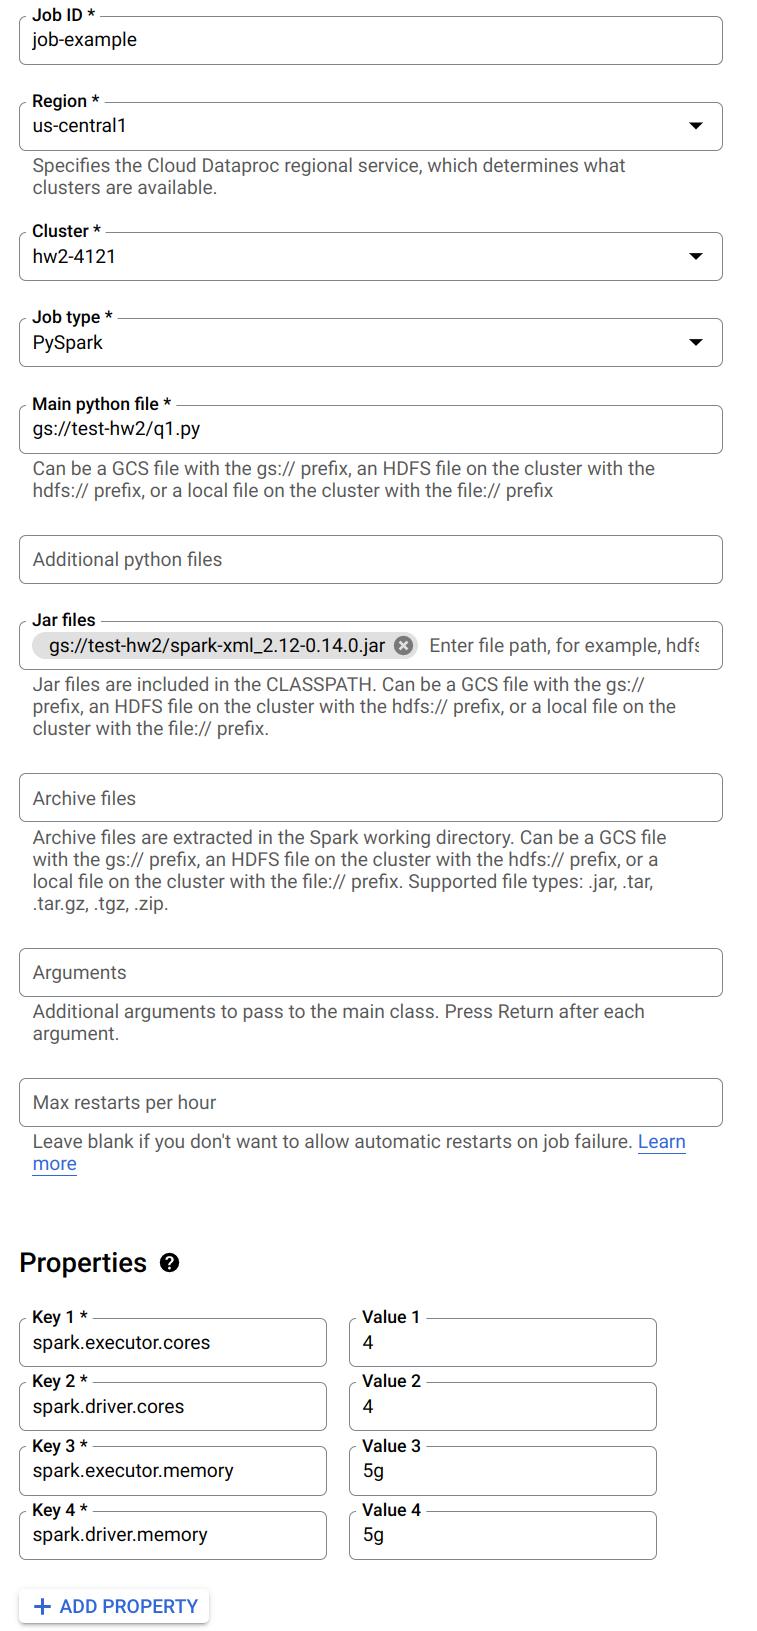
Notice you can specify a Python file to run from Google Cloud Storage. Also, when you need to read the XML files, make sure you have included the .jar file. You can also specify the number of cores and memory for driver and executor here.
Refer to this doc for details on submitting jobs.
Task 2: Webgraph on Internal Links (38 Points)
Write a Spark program which takes the XML file as input and generates a tab-separated CSV file describing the webgraph of internal Wikipedia links. The output should look like:
article1	article0
article1	article2
article1	article3
article2	article3
article2	article0
...
Link Extraction Rules
For each <page> element, the article on the left column corresponds to the string between <title> and </title>, while the article on the right column are those surrounded by a pair of double brackets [[ ]] in the <text> field, with the following requirements:
- All the letters should be converted to lowercase.
- If the internal link contains a
:, you should ignore the entire link unless it starts withCategory:. - Ignore links that contain a
#. - If multiple links appear in the brackets, take the first one; e.g., take
Ain[[A|B]].
If the remaining string becomes empty after filtering, ignore it. The two columns in the output file should be separated by a Tab (\t).
Hint: It is recommended to use UDF + regular expression to extract links from the documents. Also, try to use the built-in Spark functions to sort your results.
Task 2 Starter Code
We are providing the following complete Spark starter code to help you extract the links from the Wikipedia XML format. Note: Please copy and run this code exactly as provided below, even if you notice minor parsing edge cases. The autograder has been configured to expect this exact output. Cell 1 — Define the link extraction function:
import re

def func1(x):
    text1 = x.revision.text._VALUE
    if text1 is not None:
        text1 = text1.lower()
        lst = re.findall(r'\[\[([^\[\]]*)\]\]', text1)
        l1 = []
        newList = []
        for i in lst:
            if '#' in i or i == ' ':
                continue
            elif (':' in i) and ~(i.startswith('Category:')):
                continue
            elif '|' in i:
                k = i.split('|')
                if k[0] != ' ':
                    l1.append(k[0])
            else:
                l1.append(i)
        for i in l1:
            newList.append((x.title.lower(), i))
    else:
        return []
    return newList
Cell 2 — Create the webgraph RDD:
rdd_t = df.rdd.flatMap(lambda x: func1(x))
Cell 3 — Convert to DataFrame and preview:
df_cleaned = spark.createDataFrame(rdd_t, schema=["title", "link"])
df_cleaned.printSchema()
df_cleaned.show(truncate=False)
Cell 4 — Sort the results:
df_cleaned = df_cleaned.orderBy('title', 'link')
df_cleaned.show()
Cell 5 — Write output to GCS:
df_cleaned.coalesce(1).write.mode("overwrite").csv(
    "gs://<your-bucket-name>/task2-output",
    header=True,
    sep='\t'
)
Note: Spark writes output as a directory containing a
part-00000-XXXXX.csvfile and a_SUCCESSmarker. Since you use.coalesce(1), there will be only one output part file — that is your actual CSV.
Caution: Make sure the bucket name in the write path matches a bucket in your project. If you use a bucket that doesn’t exist or belongs to another project, you will get
AccessDeniedException: 403. Verify with!gsutil ls gs://<your-bucket-name>/.
Configuration & Questions
You should use the default configuration of Spark and HDFS, unless we specify a different one.
Set the Spark driver memory to 1GB and the Spark executor memory to 5GB to answer Questions 2-4.
Question 2. (2 points) Use wiki-test.xml as input and run the program locally on a Single Node cluster using 4 cores. Include your screenshot of the dataproc job. What is the completion time of the task?
Question 3. (2 points) Use wiki-test.xml as input and run the program under HDFS inside a 3 node cluster (2 worker nodes). Include your screenshot of the dataproc job. Is the performance getting better or worse in terms of completion time? Briefly explain.
Question 4. (2 points) For this question, change the default block size in HDFS to be 64MB and repeat Question 3. Include your screenshot of the dataproc job. Record the run time. Is the performance getting better or worse in terms of completion time? Briefly explain.
Set the Spark driver memory to 5GB and the Spark executor memory to 5GB to answer Questions 5-7. Use this configuration across the entire assignment whenever you generate a web graph from wiki-whole.xml.
Question 5. (2 points) Use wiki-whole.xml as input and run the program under HDFS inside the Spark cluster you deployed. Record the completion time. Now, kill one of the worker nodes immediately. You could kill one of the worker nodes by going to the VM Instances tab on the Cluster details page and clicking on the name of one of the workers. Then click the STOP button. Record the completion time. Does the job still finish? Do you observe any difference in the completion time? Briefly explain your observations. Include your screenshot of the dataproc jobs.

Question 6. (2 points) Only for this question, change the replication factor of wiki-whole.xml to 1 and repeat Question 5 without killing one of the worker nodes. Include your screenshot of the dataproc job. Do you observe any difference in the completion time? Briefly explain.
Question 7. (2 points) Only for this question, change the default block size in HDFS to be 64MB and repeat Question 5 without killing one of the worker nodes. Record the run time. Include your screenshot of the dataproc job. Is the performance getting better or worse in terms of completion time? Briefly explain.
Task 2 Output
Besides answering these questions, you also need to submit the code and output. You need to use wiki-small.xml as the input file, and sort both output columns in ascending order and save the complete output into a CSV file and name it task2.csv. Separate the columns with a Tab. Save the column names / headers as the first row of the CSV file. (38 points)
Task 3: Spark PageRank (38 Points)
In this task, you are going to implement the PageRank algorithm, which Google uses to rank websites in Google Search. We will use it to calculate the rank of the articles in Wikipedia. The algorithm can be summarized as follows:
- Each article has an initial rank of 1.
- On each iteration, the contribution of an article A to its neighbor B is calculated as
its rank / # of neighbors. - Update the rank of article B to be
0.15 + 0.85 * contribution. - Go to the next iteration.
The output should be a CSV file containing two columns: the first column is the article and the other column describes its rank. Separate the columns with a Tab.
Set the Spark driver memory to 5GB and the Spark executor memory to 5GB whenever you run your PageRank program. Write a script to first run Task 2, and then run Task 3 using the CSV output generated by Task 2. Always use 10 iterations for the PageRank program. When running Task 2, use wiki-whole.xml as input.
Task 3 Starter Code
We are also providing the following starter code to help you execute the distributed PageRank algorithm using Spark RDDs. Please use it as provided.
Important: You must import
addfrom theoperatormodule. Without this import, you will getNameError: name 'add' is not defined.
Cell 1 — Import and read Task 2 output:
from operator import add

df = spark.read.format("csv") \
    .option("header", "False") \
    .option("delimiter", "\t") \
    .load("gs://<your-bucket-name>/task2-output") \
    .withColumnRenamed('_c1', 'target') \
    .withColumnRenamed('_c0', 'source')
Caution: The read path here must match the exact path you wrote to in Task 2. If you wrote to
gs://<your-bucket>/task2-output, read from the same path. A mismatched path will give youAnalysisException: Path does not exist.
Cell 2 — Build the links and initial ranks:
links = df.distinct().rdd.groupByKey().cache()
ranks = links.map(lambda url_neighbors: (url_neighbors[0], 1.0))
Cell 3 — Define the contributions function:
def computeContribs(urls, rank):
    """Calculates URL contributions to the rank of other URLs."""
    num_urls = len(urls)
    for url in urls:
        yield (url, rank / num_urls)
Cell 4 — Run 10 iterations of PageRank:
for i in range(10):
    contribs = links.join(ranks).flatMap(lambda url_urls_rank: computeContribs(
        url_urls_rank[1][0], url_urls_rank[1][1]
    ))
    ranks = contribs.reduceByKey(add).mapValues(lambda rank: rank * 0.85 + 0.15)
Cell 5 — View and save the top 10 results:
r = spark.createDataFrame(ranks)
sol = r.sort("_2", ascending=False).limit(10)
sol.show()
Cell 6 — Write output to GCS:
sol.repartition(1).write.mode("overwrite").csv(
    "gs://<your-bucket-name>/task3-output",
    header=False,
    sep='\t'
)
Questions
Question 8. (2 points) Use your output from Task 2 with wiki-whole.xml as input, run Task 3 using a 3 node cluster (2 worker nodes). Include your screenshot of the dataproc job. What is the completion time of the task?
Task 3 Output
To submit the code part of the assignment you will need to use wiki-small.xml as the input file for Task 2 and then run your code for Task 3. Sort the output by the PageRank in descending order, i.e., the output should contain the title and PageRank of the articles with the top 10 scores. Save the first 10 rows as a .csv file, separating the columns with a Tab (i.e., sep='\t'). Name it task3.csv. Do NOT save the column names / headers as part of the CSV file. (38 points)
Downloading Your Output Files
After your Spark jobs complete, the output CSV files are in your GCS bucket. Spark writes output as directories, so you need to download the actual part-00000-*.csv file inside.
Option 1: From the Jupyter Notebook
# List output files
!gsutil ls gs://<your-bucket-name>/task2-output/
!gsutil ls gs://<your-bucket-name>/task3-output/

# Preview contents
!gsutil cat gs://<your-bucket-name>/task2-output/part-00000*.csv | head -20
Option 2: From the GCP Console
- Go to Cloud Storage → your bucket.
- Navigate into
task2-output/ortask3-output/. - Click on the
part-00000-*.csvfile and download it.
Option 3: From your local machine (with gsutil installed)
gsutil cp 'gs://<your-bucket-name>/task2-output/part-00000*.csv' ./task2.csv
gsutil cp 'gs://<your-bucket-name>/task3-output/part-00000*.csv' ./task3.csv
Troubleshooting
| Issue | Cause | Fix |
|---|---|---|
AccessDeniedException: 403 when writing to GCS |
Bucket doesn’t exist in your project or wrong name | Run !gsutil ls -p <your-project-id> to list your buckets. Use one that exists. |
NameError: name 'add' is not defined |
Missing import in PageRank code | Add from operator import add before the PageRank loop |
AnalysisException: Path does not exist |
Task 3 reading from a path Task 2 didn’t write to | Make sure the read path in Task 3 matches the exact write path from Task 2 |
Py4JJavaError when reading XML |
spark-xml JAR not installed | Run: sudo hdfs dfs -get gs://csee4121-s26-data/spark-xml_2.12-0.16.0.jar /usr/lib/spark/jars/ |
| Jupyter link not working | HTTPS issue | Change https to http in the URL |
| External IP Access Error | compute.vmExternalIpAccess organization policy |
Create cluster with Internal IP only, enable Private Google Access in VPC, and use IAP for SSH. See details below. |
Resolving External IP Access Errors (Organization Policy)
If you see an error like Constraint constraints/compute.vmExternalIpAccess violated, it means your Google Cloud organization blocks Virtual Machines from having public IP addresses. This is common in university projects.
Short Fix:
- VPC Network > Click default > Click your subnet (e.g.,
us-east1) > Edit > Turn On “Private Google Access” > Save. - Recreate Cluster > Advanced Options > Network configuration > Check Internal IP only.
- SSH via the console normally (it uses IAP). If it fails, use:
gcloud compute ssh <cluster-m-name> --tunnel-through-iap --zone=<zone>
Detailed Steps:
Step 1: Enable “Private Google Access” Because your VMs won’t have public internet access, they need this setting to securely download required packages (like Jupyter) internally.
- In the Google Cloud Console, search for VPC network.
- Click on the network named default.
- Click on the subnet for your region (e.g.,
us-east1). - Click Edit at the top.
- Turn On the setting for Private Google Access.
- Click Save.
Step 2: Create the Cluster with “Internal IP Only”
- Go to the Dataproc > Create cluster page.
- Fill out the settings as usual.
- Before hitting create, open Advanced Options at the bottom.
- Under Network configuration, check the box for Internal IP only.
- Ensure your staging bucket and Jupyter component are still selected, then click Create.
Accessing SSH without an External IP Once successful, your nodes will only have internal IPs. The “SSH” button in the console should automatically use Google’s Identity-Aware Proxy (IAP). If it fails, run this in the Cloud Shell:
gcloud compute ssh <cluster-m-name> --tunnel-through-iap --zone=<zone>
Best Practices
- Delete the cluster after you are done for a coding session. Do not leave it on overnight. Otherwise, you will burn through your credits very quickly.
- Start with small files and use a one node setup to debug your code. Then try to run your code on bigger files and a three-node setup.
- It is recommended to use Jupyter Notebook to debug your code. Make sure you have shutdown all of your Jupyter notebooks before you submit your job using the web interface.
1. Written Questions 1-8
Please compile your answers to written questions 1-8 into a single PDF and upload it to Gradescope. Please keep your answers succinct. We may deduct points for excessively verbose answers. For theoretical questions, a maximum of 1–2 lines per answer is expected.
2. Code and Outputs (zip file)
Name the file <UNI-1>_<UNI-2>.zip.
The Spark projects from Task 2-3 should go under folder names task2, task3, accordingly.
Inside each folder, in addition to the Jupyter notebook and Python files, there should be an additional file named config which describes configurations or additional steps you did to run the three tasks mentioned below.
You also need to provide a config file which describes configurations or additional steps you did to run the following tasks on a single Spark node:
- Use the program in Task 2 to take
wiki-small.xmlas input to generate the graph. - Use the program in Task 3 to take the graph you just generated and output a rank list of the articles in the dataset.
Try to be clear about the instructions to run these steps. The purpose of doing this is to check if your program does what we mentioned in the spec. Do not worry whether your program has the lowest completion time.
In addition to the code, you will need to submit the following output files for each of the tasks:
schema.txttask2.csv(complete webgraph, with header)task3.csv(top 10 PageRank results, no header)
UNI-1_UNI-2_assignment2.zip
├── task1
│   └── schema.txt
├── task2
│   ├── task2.csv
│   ├── task2.py
│   ├── task2.ipynb
│   └── task2config.txt
└── task3
    ├── task3.csv
    ├── task3.py
    ├── task3.ipynb
    └── task3config.txt